

Tips
Concrete Driveways
[fa class=”fa-file-pdf-o]Download PDF
6 Steps to Success
A concrete driveway represents an investment that is designed to last a lifetime, provided proper procedures are followed.
The average home-owner will IlQ1 normally be able to install a concrete driveway without expert assistance. It is strongly recommended that a qualified contractor be engaged to ensure a satisfactory job.
To provide a quality driveway, the following guidelines must be carefully observed.
(Concrete should be placed between April and September. If placed outside this time frame, additional precautions will be necessary.)
1. DETERMINE THE REQUIRED THICKNESS (MINIMUM)
| a) | For cars and pick-ups | 100mm |
| b) | For light trucks | 125mm |
| c) | For occasional heavier trucks | 150mm |
| (placed on competent subgrade) |
2. SITE PREPARATION
- Concrete can be placed directly on uniform subgrade after removing the topsoil, or on deteriorated asphalt pavement. Excavate or bring to grade as necessary using granular ‘A’ as levelling course (typically 100mm).
- Make sure sub-grade is uniform, well compacted and contains no frozen material.
- Slope away from buildings at 2%.
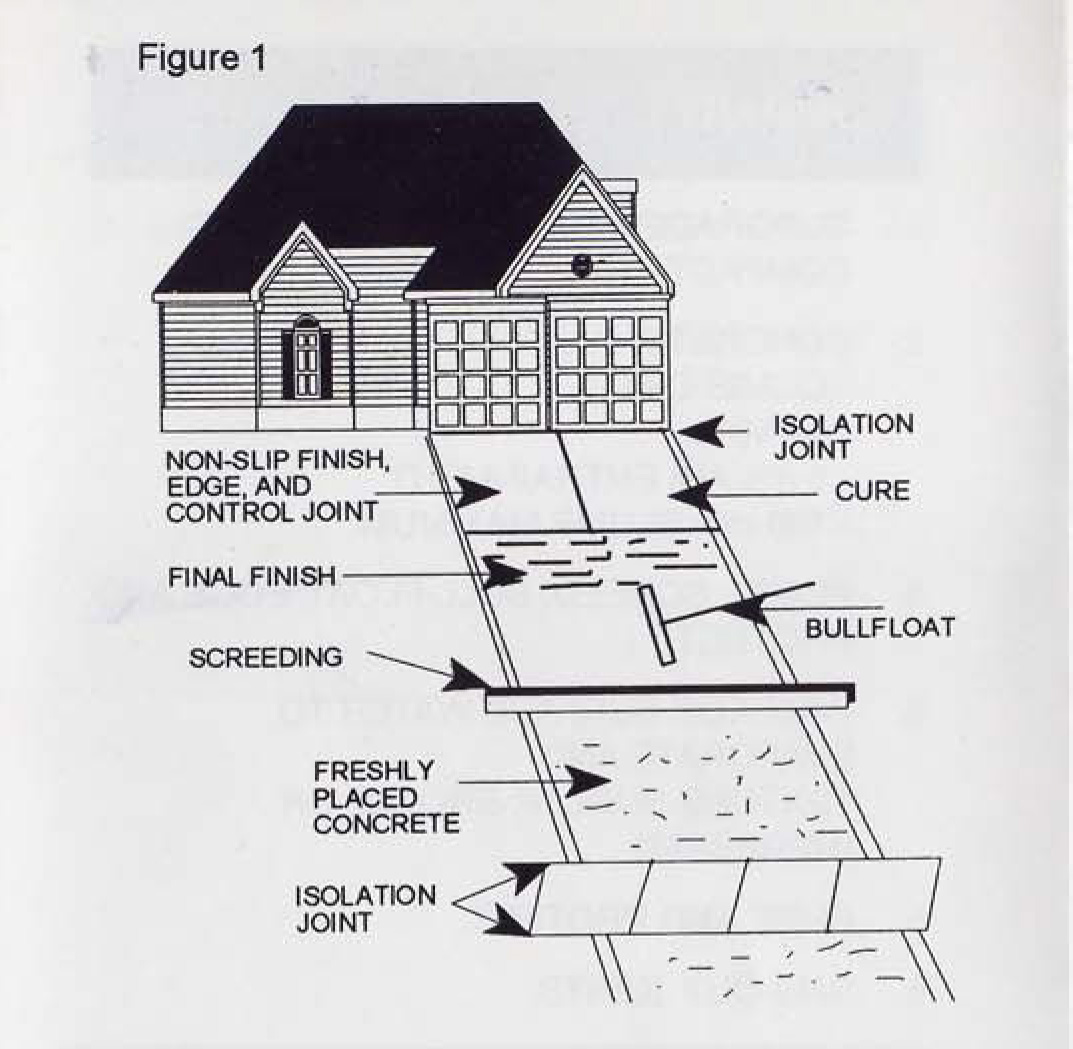
- Install isolation joints using asphalt impregnated board strips. (see figure 1)
- To form driveway, use stiff wood forms kept in position with stakes not more than 1 metre apart. Top of stakes should be flush with, orslightly below, top of form at finished grade [see screeding – section 4 (e)).
- Plan exact position of concrete joints (see part 6).
DO NOT ALLOW power floats or trowels to be used. Overworking the fresh concrete causes scaling. This extra finishing is not required and will reduce the durability of the slab.
3. PLAN YOUR REQUIREMENTS FOR LABOUR AND MATERIAL
- Concrete: Class C-2, 32 MPa; 5-8% air entrainment, 100mm slump (maximum), for all exterior slabs on grade as required by CAN/CSAA23.1
using quality proven aggregate. 48 hours advance notice of delivery should be provided. - For coloured concrete, it is recommended that the colour be integrally mixed with the concrete at the time of batching. Air entrainment (5%-
8%) must be measured after the colour has been mixed in. - Make sure adequate labour is on hand when concrete will be delivered – normally a minimum of 3 persons, but more for larger jobs or when
placing on hot, dry days. - Check list of tools and materials needed:
- large roll of plastic sheeting (protection from rain)
- wheelbarrows, shovels rakes
- water supply for curing and wetting subgrade
- long handled bull-float about 120mm wide minimum (Preferably wood or magnesium for air entrained concrete)
- straight rigid board for screeding (50mm x 0mm x 300mm)
- vapour retardant
- concrete broom for texturing
- curing materials (burlap and water or curing compounds).
4. ORDER AND PLACE CONCRETE
- Thoroughly soak the subgrade without leaving free standing water. Oil the forms before placing concrete
- A .1QQmm slump is adequate for placement. Adding water to increase the slump or workability has a very detrimental effect on both strength and durability of the concrete.
- Distribute concrete using wheelbarrows (or directly from concrete mixer truck if possible); use shovels and rakes to bring to rough grade avoiding segregation.
- Strike off the concrete to finish grade by using a straight board on edge between the forms – use “sawing” motion. Tap forms to consolidate the
concrete. - Screeding: Smooth the surface using the long handled bull-float (use edging tool to finish edges) – DO NOT USE STEEL TROWELS AT ANY TIME.
- For final non-slip finish use a concrete broom, burlap drag, float or Impressed mat finish.
- IF PLACING ON A HOT, DRY OR WINDY DAY, TAKE SPECIAL PRECAUTIONS
- protect fresh concrete from rapid moisture loss by covering with plastic after screeding to keep surface moist, or use wind screens, fog nozzles,
vapour retardants, etc. - be prepared for fast setting during warm weather.
- protect hardening concrete by curing concrete immediately after final finish.
- During cold weather, longer time is required before performing final finish. Do not perform final finish while concrete is still bleeding.
- protect fresh concrete from rapid moisture loss by covering with plastic after screeding to keep surface moist, or use wind screens, fog nozzles,
NOTE: Improper procedures can result in a poor quality job.
5. Colour – Integral
Colour can be added to the Mix!
6. Curing and Sealing
- For proper curing, moisture must be retained in the slab for an extended period. Curing must start immediately following final finish and is
accomplished by using:- Curing membranes/compounds which can be easily rolled or sprayed on as soon as the bleed water is evaporated. MAKE SURE THAT THE MANUFACTURERS’ RECOMMENDED DOSAGE AND COVERAGE IS OBSERVED. QB
- Wet burlap, soaking hoses, waterproof paper or polyethylene film to keep the surface CONSTANTLY wet for 7 days. Do not place hoses on surface.
- DO NOT APPLY DE-ICERS (eg. SALT) UNTIL THE CONCRETE HAS CURED FOR 30 DAYS. DO NOT USE AMMONIUM BASED DE-ICERS AT ANY TIME.
- If the concrete is placed in the late part of the year below 5’C, use polyethylene film or other cold weather curing methods. An air drying period of one month after the curing period is required before de-icing salts can be applied. A PENETRATING SEALER can be applied as caution against chloride penetration.
- Under normal conditions the concrete may be sealed with a PENETRATING SEALER according to the recommendations of the manufacturer:
- after 30 days if a curing membrane has been used
- after a period of air drying if water-cured.
7. Control Joints
As concrete ages initially, it shrinks because of water evaporation and cooling of the concrete. CR AC~S will occur at random unless they are controlled 1n a
pre-determined manner.
- Control joints (preferably sawn) shall be:
- cut as soon as possible without pulling the aggregate out, usually within 4 to 12 hours after concrete has been placed (can be much longer in cold weather).
- cut 1/4 the thickness of the slab – minimum depth.
- not more than 3m apart for 1 OOmm thick slab, 4m apart for 125mm slabs, and 4.5m apart for 150mm or thicker slabs.
8. Summary
- SUBGRADE MUST BE UNIFORM AND COMPACT.
- CONCRETE:
- CLASS C-2
- 32 MPa
- 5-8% AIR ENTRAINMENT
- 100 mm SLUMP MAXIMUM.
- PLACE, SCREED, BULL-FLOAT, EDGE AND PROTECT.
- WAIT FOR SURFACE WATER TO EVAPORATE AND TEXTURE-BURLAP, BROOM, OR IMPRESSED.
- CURE AND PROTECT.
- SAW-CUT JOINTS.
Homeowner Concrete Information
[fa class=”fa-file-pdf-o] Download PDF
Common concrete issues and the home:
Cracking
It is common for all concrete to go through a slight shrinking process as the plastic or wet concrete hardens (dries) and loses water.
The builder and the contractor can both minimize and control shrinkage cracking by taking certain precautions, such as installing control joint material in walls or saw-cutting floor slabs in a timely fashion. See DRIVEWAY Brochure in Technical Information Section
Excessive water
Too often contractors demand excessive amounts of water to be added to the concrete prior to placement in the forms, to make concrete more flowable. This excessive water is very harmful to the overall performance and quality of your concrete. This practice does not conform to Ontario Building Code minimums.
Excessive water can:
Increase
- shrinkage
- flow
- amounts of evaporable moisture in basement which can lead to health hazards from mould and mildew (biological attack)
Decrease
- strength – compressive
- strength gain
- durability
- density – makes it more porous
Performance Rated Concrete
Home Builders and Forming Contractors should be following the minimum standards as set out in the Ontario Building Code and many do. Ready Mixed Concrete Association Members offer Performance Rated Concrete to the marketplace across the province. PRC is designed to offer the builder and/or contractor concrete with improved performance with the placing characteristics he/she is used to, and still meet OBC minimums. Ask your Builder if your concrete is PRC.
Structural Cracking can be seen in two basic forms, each with its own cause and affect.
- Settlement – when the sub-base or footings settle after construction causing the walls or floors to crack from excess strain
- Backfilling – if basement walls are backfilled too early and/or with improper procedures followed, the result can be a crack. It can be caused from too much lateral pressure exerted on one side of the wall, with no lateral support or sufficient bracing on the inside of the wall during the procedure.
Dusting Floors – usually occurs when the concrete floor slab has been finished improperly:
- Floor finished too early, working the excess surface moisture into top of slab which
weakens surface - Floor finished too late adding free water to surface and finishing into top of slab which
weakens surface - Carbon dioxide from unvented heaters which attacks cement product which weakens
surface
Other – For answers to more questions please contact us at homeownwer@rmcao.org